Using a Custom CA on Android
This article describes a procedure for adding a Custom Certificate Authority (CA) to the User Trust Anchor on Android. Once added, applications can choose to utilize the User Trust Anchor, allowing TLS connections to systems using certificates signed by the Custom CA.
From the Android Network Security Configuration documentation:
An app may want to trust a custom set of CAs instead of the platform default. The most common reasons of this are:
- Connecting to a host with a custom certificate authority, such as a CA that is self-signed or is issued internally within a company.
- Limiting the set of CAs to only the CAs you trust instead of every pre-installed CA.
- Trusting additional CAs not included in the system.
Assets
Two assets are required for this procedure:
- A Test Workstation where
openssl&adbcommands will be run. - A Test Android Device where the Custom CA will be added.
Assumptions
The following assumptions are made about the environment where this procedure will be executed:
- No Custom CA has been created yet.
- The Test Android Device is in Developer Mode with USB Debugging enabled.
- N.B. root/su access IS NOT needed for this procedure.
- For Testing: You have a DNS resolver that you add entries to and that is
shared by the Test Workstation & Test Android Device. For example, with
dnsmasq:
address=/server.example.com/192.168.1.129
Please Note
There is at least one special consideration to keep in mind when executing this procedure:
- As of Android 7, User Trust Anchors are not utilized by default. Application
developers must choose to use User Trust Anchors. See this article for more
details. An example configuration utilizing User Trust Anchors is below:
<base-config cleartextTrafficPermitted="true">
    <trust-anchors>
        <certificates src="system" />
        <certificates src="user" />
    </trust-anchors>
</base-config>
Create a new Custom CA
These steps rely on the OpenSSL command-line tool openssl.
Step 1 - Create a Private Key
$ openssl ecparam -genkey -name secp384r1 \
    -param_enc explicit -param_enc named_curve \
    -out custom_ca.pk.pem
Step 2 - Create a Public Certificate
$ openssl req -x509 -new -sha384 -days 30 -nodes \
    -key custom_ca.pk.pem -out custom_ca.cert.pem \
    -subj "/O=Custom CA" \
    -extensions ext \
    -config <(cat <<EOF
    [req]
    distinguished_name=dn
    [dn]
    [ext]
    basicConstraints=CA:TRUE,pathlen:0
    )
Step 3 - Verify the Public Certificate
$ openssl x509 -inform PEM -in custom_ca.cert.pem -text -noout
Step 4 - Export the Public Certificate in DER format
$ openssl x509 -inform PEM -outform DER \
    -in custom_ca.cert.pem -out custom_ca.cert.der
Create a Certificate Signing Request (CSR)
Step 1 - Create a Private Key
$ openssl ecparam -genkey -name secp384r1 \
    -param_enc explicit -param_enc named_curve \
    -out server.example.com.pk.pem
Step 2 - Generate a CSR with SAN support
$ openssl req -new -sha384 -days 30 -nodes \
    -key server.example.com.pk.pem \
    -out server.example.com.csr.pem \
    -subj "/CN=server.example.com" \
    -config <(cat <<EOF
    [req]
    distinguished_name = req_distinguished_name
    req_extensions = req_ext
    [req_distinguished_name]
    commonName = server.example.com
    [req_ext]
    subjectAltName = @alt_names
    [alt_names]
    DNS.1 = server.example.com
    )
Step 3 - Verify the CSR
$ openssl req -in server.example.com.csr.pem -text -noout
Sign CSR with Custom CA
Step 1 - Sign our server's CSR with our Custom CA
$ openssl x509 -req \
    -CAcreateserial \
    -days 30 \
    -sha384 \
    -CA custom_ca.cert.pem \
    -CAkey custom_ca.pk.pem \
    -in server.example.com.csr.pem \
    -out server.example.com.cert.pem  \
    -extensions 'v3_req' \
    -extfile <(cat <<EOF
    [v3_req]
    subjectAltName = @alt_names
    [alt_names]
    DNS.1 = server.example.com
    )
Step 2 - Verify the new server Certificate:
$ openssl x509 -inform PEM -in server.example.com.cert.pem -text -noout
Install Custom CA Certificate on Android Device
Step 1 - Copy Custom CA Certificate in DER format to the Android device
$ adb push custom_ca.cert.der /sdcard/Download
Step 2 - Add the Custom CA's Certificate to Android's Trust Chain
This step varies by device manufacturer, and tends to either have the user open Settings, and browse to certificate settings. In my experience, any certificates I copied to my device only showed up in Settings -after- a reboot, but were almost always accessible from a file browser
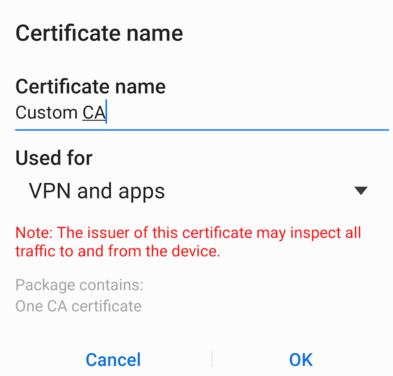
From a Samsung Galaxy XCover Pro SM-G715U1 running Android 10:
- Open 'My Files'

- Browse to Internal Storage > Download and select custom_ca.cert.der.
- When prompted, enter a name for the certificate:

- You should now see a notification of 'Custom CA installed':

Test TLS connections from Android Device
This test verifies Android's trust of certificates signed by the Custom CA by using Chrome to browse to a Mock Webserver over TLS. The Mock Webserver presents a certificate signed by the Custom CA.
Step 1 - Start the Mock Webserver
$ openssl s_server \
   -cipher ECDHE-ECDSA-AES256-GCM-SHA384 \
   -named_curve secp384r1 \
   -no_dhe \
   -www \
   -accept 443 \
   -cert server.example.com.cert.pem \
   -key server.example.com.pk.pem \
   -servername server.example.com \
   -cert2 server.example.com.cert.pem \
   -key2 server.example.com.pk.pem
Step 2 - Browse to the Mock Webserver
From the Test Android Device, browse to https://server.example.com. You should not receive a prompt to accept a certificate, or a notification that the certificate is invalid. Instead, you should see something similar to:
s_server -cipher ECDHE-ECDSA-AES256-GCM-SHA384 -named_curve secp384r1 -no_dhe -www -accept 443 -cert server.example.com.cert.pem -key server.example.com.pk.pem -servername server.example.com -cert2 server.example.com.cert.pem -key2 server.example.com.pk.pem
Secure Renegotiation IS supported
Ciphers supported in s_server binary
TLSv1/SSLv3:ECDHE-ECDSA-AES256-GCM-SHA384
---
Ciphers common between both SSL end points:
ECDHE-ECDSA-AES256-GCM-SHA384 ECDHE-ECDSA-AES128-GCM-SHA256 ECDHE-ECDSA-AES256-SHA384
ECDHE-ECDSA-AES128-SHA256  ECDHE-ECDSA-AES256-SHA     ECDHE-ECDSA-AES128-SHA
ECDHE-ECDSA-CHACHA20-POLY1305 ECDHE-RSA-AES256-GCM-SHA384 ECDHE-RSA-AES128-GCM-SHA256
ECDHE-RSA-AES256-SHA384    ECDHE-RSA-AES128-SHA256    ECDHE-RSA-AES256-SHA
ECDHE-RSA-AES128-SHA       ECDHE-RSA-CHACHA20-POLY1305 AES256-GCM-SHA384
AES128-GCM-SHA256          AES256-SHA256              AES128-SHA256
AES256-SHA                 AES128-SHA                 ECDHE-ECDSA-DES-CBC3-SHA
ECDHE-RSA-DES-CBC3-SHA     DES-CBC3-SHA
---
New, TLSv1/SSLv3, Cipher is ECDHE-ECDSA-AES256-GCM-SHA384
SSL-Session:
    Protocol  : TLSv1.2
    Cipher    : ECDHE-ECDSA-AES256-GCM-SHA384
    Session-ID: 3F0CBE77368393CC48C12AFF49D974B3C3F4AFC3E80EDF440D4C7F04CB8D8894
    Session-ID-ctx: 01000000
    Master-Key: 7324557574706DB53A7664C2E9E51D51E44E6871388383EA8F4E60EE37BCF4C6419ECC4C20443660DFE551B77382F359
    Start Time: 1596586218
    Timeout   : 7200 (sec)
    Verify return code: 0 (ok)
---
   0 items in the session cache
   0 client connects (SSL_connect())
   0 client renegotiates (SSL_connect())
   0 client connects that finished
   0 server accepts (SSL_accept())
   0 server renegotiates (SSL_accept())
   1 server accepts that finished
   0 session cache hits
   0 session cache misses
   0 session cache timeouts
   0 callback cache hits
   0 cache full overflows (128 allowed)
---
no client certificate available